
正式操作前,先在本地VBOX虚拟机里先学习一下,本地有个 ARCH系统,使用EFI安装的
从GitHub搜索 netboot.xyz 项目,下载 netboot 引导文件链接
如图先下载 netboot.xyz.efi 和 netboot.xyz-arm64.efi 到EFI分区

df -h      # 查看EFI 挂载目录
cd /boot/  # 进入挂载目录

# 为方便做了个下载镜像
wget lyvba.com/netboot.xyz.efi
wget lyvba.com/netboot.xyz-arm64.efi

reboot
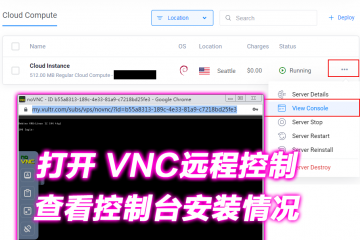
建立VNC远程控制后重启,按Esc 进入EFI_Shell ,按Esc进入命令行

fs0:      # 选择EFI引导分区
ls        # 查看是否有引导文件
netboot.xyz.efi   # 使用efi引导
正式开始 华为ARM64 EFI_Shell 安装,目前能正确 netboot.xyz-arm64.efi 引导菜单

EFI Shell 选择

网络引导 netboot.xyz-arm64.efi

netboot.xyz 安装系统菜单

华为ARM 选了debian 10 和 9 文本模式安装失败,后来选择图形模式刚装 Debian 11 成功了
EFI  stub:   Booting Linux Kernel...
EFI  stub:   EFI_RNG_PR0T0C0L unauailable, no randomness supplied
EFI  stub:   Generating empty DTB
EFI  stub:   Exiting boot seruices and installing uirtual address map...

EFI 存根:引导 Linux 内核...
EFI 存根:EFI_RNG_PR0T0C0L 不可用,不提供随机性
EFI 存根:生成空的 DTB
EFI 存根:退出引导服务并安装实际地址映射...


0 条评论