使用微软语音把文本转语音-前提条件,激活免费的微软AI语音
微软语音 晓晓 文本转语音 源码 speech_synthesis.py
import os
import azure.cognitiveservices.speech as speechsdk
class SPEECH:
def __init__(self):
# 需要转语音的文本文字
# 设置音频保存本地地址
self.output_file = "r:\\output.wav"
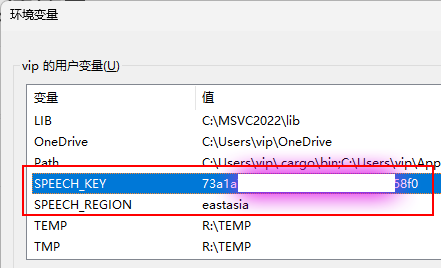
# 从环境变量中获取订阅密钥和区域信息
self.speech_config = speechsdk.SpeechConfig(subscription=os.environ.get('SPEECH_KEY'),
region=os.environ.get('SPEECH_REGION'))
# 设置语音合成使用的语言—— 云枫
self.speech_config.speech_synthesis_language = "zh-CN"
# self.speech_config.speech_synthesis_voice_name = 'zh-CN-YunfengNeural' # 云枫
self.speech_config.speech_synthesis_voice_name = 'zh-CN-XiaoxiaoNeural' # 晓晓
def speak_txt(self):
# 配置音频输出为默认扬声器
audio_config = speechsdk.audio.AudioOutputConfig(use_default_speaker=True)
return audio_config
def down_audio(self):
# 配置音频输出为默认扬声器
audio_config = speechsdk.audio.AudioOutputConfig(filename=self.output_file)
return audio_config
def run(self, text, audio_config):
# 创建语音合成器
speech_synthesizer = speechsdk.SpeechSynthesizer(speech_config=self.speech_config, audio_config=audio_config)
# 调用语音合成API将文本转换为语音
speech_synthesis_result = speech_synthesizer.speak_text_async(text).get()
# 检查语音合成的结果并进行相应的处理
if speech_synthesis_result.reason == speechsdk.ResultReason.SynthesizingAudioCompleted:
print("Speech synthesized for text [{}]".format(text))
elif speech_synthesis_result.reason == speechsdk.ResultReason.Canceled:
cancellation_details = speech_synthesis_result.cancellation_details
print("Speech synthesis canceled: {}".format(cancellation_details.reason))
if cancellation_details.reason == speechsdk.CancellationReason.Error:
if cancellation_details.error_details:
print("Error details: {}".format(cancellation_details.error_details))
print("Did you set the speech resource key and region values?")
if __name__ == "__main__":
my_speech = SPEECH()
while True:
# 从控制台获取要转换为语音的文本
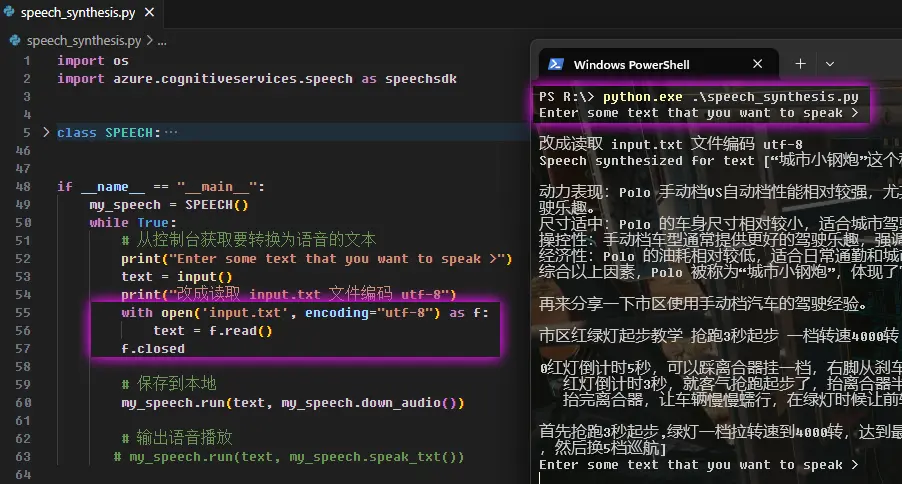
print("Enter some text that you want to speak >")
text = input()
print("改成读取 input.txt 文件编码 utf-8")
with open('input.txt', encoding="utf-8") as f:
text = f.read()
f.closed
# 保存到本地
my_speech.run(text, my_speech.down_audio())
# 输出语音播放
# my_speech.run(text, my_speech.speak_txt())
打开控制台,使用 Python 执行脚本把文本转换语音
# 设置音频保存本地地址, 源码中修改
self.output_file = "r:\\output.wav"
# 输入的文本文件,保存自己写的视频文案
with open('input.txt', encoding="utf-8") as f:

# 执行这个命令,程序工作运行
python.exe .\speech_synthesis.py
使用FFMPEG把语音合并到视频中
- 要将新语音音频合并到视频中,同时保留原视频的背景音乐,并将新声音的音量调整为1.5倍,可以使用以下
ffmpeg 命令:
ffmpeg -filter_complex  "[1:a]volume=1.2[a1];[0:a][a1]amix=inputs=2:duration=longest" \
  -i 1.mp4  -i new.wav  -c:v copy  new.mp4
命令解析:
[1:a]volume=1.2[a1]:将新音频的音量调整为1.2倍,并将结果命名为 [a1]。[0:a][a1]amix=inputs=2:duration=longest:将原音频和调整过的音频混合在一起。-c:v copy:复制视频流,不进行转码。new.mp4:指定输出的视频文件名。
也可以把背景音乐混合到视频中,volume=0.3 比较合适
ffmpeg -filter_complex  "[1:a]volume=0.3[a1];[0:a][a1]amix=inputs=2:duration=longest" \
  -i 1.mp4  -i bg.mp3  -c:v copy  new.mp4
自己写 MP4CUT 工具,调用ffmpeg 剪辑视频
$ mp4cut.exe
Usage: mp4cut.exe  sample.mp4  00:08  01:18

$ mp4cut new.MP4  0:08  0:18

ffmpeg version 5.0.1-full_build-www.gyan.dev Copyright (c) 2000-2022 the FFmpeg developers
  built with gcc 11.2.0 (Rev7, Built by MSYS2 project)

Input #0, mov,mp4,m4a,3gp,3g2,mj2, from 'new.MP4':
  Metadata:
    major_brand     : isom
    minor_version   : 512
    compatible_brands: isomiso2avc1mp41
    encoder         : Lavf59.16.100
  Duration: 00:02:45.00, start: 0.000000, bitrate: 6123 kb/s
  Stream #0:0[0x1](und): Audio: aac (LC) (mp4a / 0x6134706D), 48000 Hz, stereo, fltp, 128 kb/s (default)
Stream mapping:
  Stream #0:1 -> #0:0 (copy)
  Stream #0:0 -> #0:1 (copy)
Press [q] to stop, [?] for help
frame=  300 fps=0.0 q=-1.0 Lsize=    7552kB time=00:00:10.00 bitrate=6181.3kbits/s speed=1.07e+03x
video:7385kB audio:156kB subtitle:0kB other streams:0kB global headers:0kB muxing overhead: 0.131130%
FFMPEG 按时间截取视频命令如下,我们使用 C/C++ 语言编写代码来调用 ffmpeg
ffmpeg  -i ./plutopr.mp4   \
-vcodec copy -acodec copy -ss 00:18:45 -to 00:19:36  \
./cutout1.mp4  -y
MP4CUT工具源码: mp4cut.cpp
#include <string>
#include <cstring>
#include <cstdio>
#include <cctype>

void replace_colon(char* str)
{
    while (*str) {
        if (*str == ':')
            *str = '-';
        str++;
    }
}

int main(int argc, char* argv[])
{
    if (4 != argc) {
        puts("Usage: mp4cut.exe  sample.mp4  00:08  01:18 ");
        return -1;
    }

    /*******
    FFMPEG  按时间截取视频
    ffmpeg  -i ./plutopr.mp4   \
    -vcodec copy -acodec copy -ss 00:18:45 -to 00:19:36  \
     ./cutout1.mp4  -y
    *******/

    char cmdline[4096];
    sprintf(cmdline, "ffmpeg -i  \"%s\"  -vcodec copy -acodec copy -ss %s  -to %s  -y  \"%s\" ",
            argv[1], argv[2], argv[3], argv[1]);

    char newfile[512];    // 时间戳文件名后缀
    sprintf(newfile, ".Cut_%s_%s.mp4\" ", argv[2], argv[3]);
    replace_colon(newfile);

    char* pch = strrchr(cmdline, '.');

    FILE* pFile;
    pFile = fopen(argv[1], "r");
    if (pch != NULL) {
        strcpy(pch, newfile);

        if (pFile != NULL) {
            //  puts(cmdline);

            system(cmdline);
        }

    }
}


0 条评论